How often have you spent hours working to take apart a piece of machinery and walked away frustrated that the manual in no way shape or form was created by the person actually working on the object in question? Yes, this happens all the time unfortunately. Our Buell build left us hanging this past Saturday with utter frustration over the isolators on the swingarm. Our chain block was put into overtime lifting, descending, lifting, hanging, banging and cussing like there is no tomorrow in frustration over removing these damn isolators that dampen the vibration where the swingarm and motor mount connect to the frame on early Buell models.
When in doubt, search out the internet and type in a myriad of questions on how to fix what ya need. After a few queries we found several options and one amazing link lead us to the page of Daniel C. Starr and his ingenious tool. Below is a repost from Daniel's site and his home made custom tool for replacing the isolators. If only we could have found this before we started to tear right into the bike, doh!
 |
| Tube frame Buell islotator that is damaged and needs replacing |
"Tube-frame Buells use what are more or less the same rubber biscuit "isolators" as the Harley touring bikes (no surprise there; Erik Buell is said to have invented the system). And, from time to time, these isolators wear out. The symptom I noticed was a lot of vibration through the footpegs, especially when the bike was heavily loaded (i.e., with gear for the week-long trip to Deals Gap I was about to depart on) and hitting any kind of a dip in the road. And when they start failing, riding is not an option--these things are chunks of rubber and metal that are glued together and support the weight of the bike and rider in a shear mode. When they start coming apart, there ain't nothing keeping your ass off the pavement. The photo at right shows just how far my right-side isolator had gone by the time I discovered it was failing. The end plate (which nestles into the frame) had separated from the rubber over close to half the isolator's circumference. Not at all a good thing. I had to replace these puppies right now. Here's how I did it.
On
some bikes (the Harleys, the S2 and earlier models, and the X1
Lightning), the rear isolators are held in place by a bolt-on plate that
lines them up and squeezes them into position. On these bikes,
replacing the suckers is easy. But on some models--S1 Lightning, S3/S3T
Thunderbolt, and M2 Cyclone), the isolators are slipped into recesses in
the frame before the engine and swingarm block are lifted in from
below. That is, there's no removable piece providing access.
The shop manual says you're supposed to remove the engine from the frame to change the rear isolators. Aiee! most customers say in response. So various imaginative people have come up with schemes to free the rubber biscuits without having to hang the frame from an engine hoist while strapping the motor to a floor lift (and by the way, disconnecting every oil hose and half the electrical wiring on the bike). We had some motivation here.
Oh, and of course you may not be doing this because the isolators have died; you may simply want to replace a worn drive belt (especially if your belt was set up too tight by the selling dealer, which many tube frame Buell belts were). That's what led me to develop this scheme. Word to the wise: if you're going to go to the effort (even the significantly reduced effort under my scheme) to remove the isolators, you might as well replace all the stuff that's replaceable here. In other words, if the only thing "bad" appears to be the belt, replace the isolators at the same time; if the isolators look bad and the belt looks OK, replace the belt anyway. There's nothing worse than having to rip the bike apart a year later because a belt or an isolator that looked OK the last time you had the bike apart is now going south on you. How did I learn this? Because I replaced the belt at 40,000 miles and didn't replace the isolators while I had things apart, of course...
Also, keep in mind that I'm not a Buell employee, and Buell didn't approve of this procedure (or even look at it, far as I know). It worked for me, and it was a lot easier than the procedure found in the manual--but remember that 30 years ago some aircraft mechanics were saying the same thing about using a fork lift to remove/install the engines on a DC-10, and we all know how that turned out. I make no warranty that this procedure will work for you. Be careful out there...
So, with that in mind, let's get started:
Step 1. Get the bike up in the air and remove the back wheel, hugger and belt guards. Make sure you have plenty of room to move around beneath its nether regions.
Step 2. Put a jack (preferably one with wheels) under the transmission to support its weight, and then remove the two big allen bolts that hold the isolators to the swingarm block. These are 1/2" head allens. If you don't have an allen socket of that size, Lafayette has a cheap substitute: buy a 2" long by 1/2" "coupler nut" and stick it into a (six point) 1/2" socket. Voila! An Allen substitute! Be careful removing the bolts; you don't want to mess up the threads. In particular, make sure you've got the jack adjusted so that the bolts aren't snagging on the isolator base plates as you take 'em out. It's surprisingly easy to monge the threads.
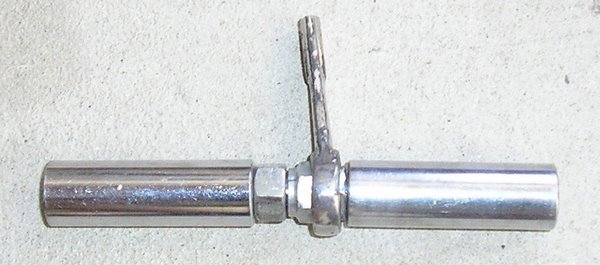
Step 3. Assemble the spreader tool shown below (Note--click on any of these pictures to expand it). The center piece of the tool is about six inches of 3/8" threaded rod from the hardware store. The pieces on it, from left to right, are a 3" piece of stout tubing (I used a leftover Harley Sportster turn-signal stalk, thereby keeping the whole thing an "Authentic Harley Special Tool"), a regular 3/8 nut, a jammed-together pair of 3/8" nuts (one of them's a locknut; it's inside the wrench and the two are held together with Loctite. In the best of all possible worlds, the central nut would be welded to the threaded rod), half of a 9/16" box wrench, and the other turn signal stalk.
 |
| Custom Buell isolator separator tool |
This is what it'll look like when it's assembled and ready to go:
 |
| 3/8ths threaded rod, jam nuts loctite together, 9/16th wrench, steel sheath = Buell isolator tool |
Step 4. Slither up under the rear end of the bike, taking a 1/2" and 9/16" wrench and the tool you just fabricated with you. Remove the 9/16" bolt that fastens the turnbuckle to the swingarm carrier (this allows the engine and transmission to move side to side in the frame). Then remove the 1/2" bolt that holds the battery ground strap to the swingarm carrier. You'll find the hole goes all the way through the boss on the swingarm carrier, and it's tapped all the way through. So re-install the bolt from the left side, so that about 1/4" of it sticks out the right side of the boss. This provides a pin for the left end of the special tool to align on.
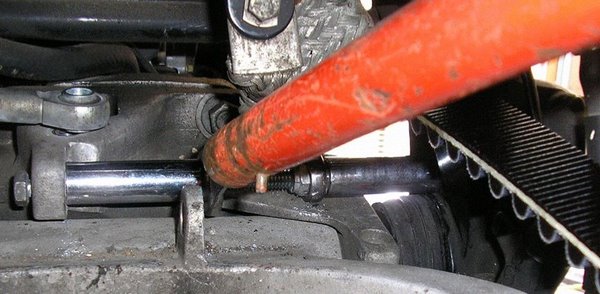
Step 5. Brace the cut-down 9/16" wrench part of the tool against the top of the swingarm carrier, and turn the nuts (fingers should be adequate) until the other end of the tool is pressed up firmly against the inside of the frame just above the right isolator. See the picture below:
 |
| Notice the red bar, need extra torque, use the handle of a your portable car jack |
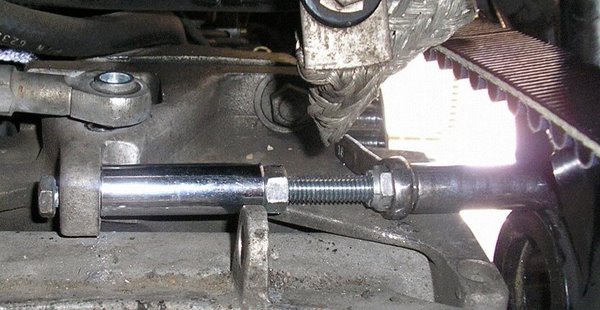
Step 6. Then, as the picture above also shows, put a big long wrench on the first nut (the one that presses up against the turn signal stalk on the left end of the tool) and turn this nut to spread the tool out and shift the engine/trans/swingarm carrier to the left. This is not actually spreading the frame; it's just compressing the left isolator. You will need to apply a lot of torque, which is why I put a long lever (a jack handle, actually) on the wrench. The cut-down wrench that's a part of the tool keeps the threaded rod from turning. Keep turning the wrench and extending the tool until you can pop out the right isolator, as seen below:
 |
| Buell isolator tool, used effectively to drop out the isolators for replacing |
Notice how you've shifted the engine/trans/swingarm carrier about a quarter inch to the left--you can see this in the misalignment between the adjustment turnbuckle and the hole in the boss on the swingarm carrier. This picture also clearly shows how the cut-down 9/16" wrench is braced against the top of the swingarm carrier to keep the lock nut (and the threaded rod) from turning.
Step 7. Turn the nuts on the tool the other way (the cut-down box wrench part will flip around and brace itself against the swingarm), until you can remove the tool.
Step 8. Give the swingarm a yank to the right, and the left isolator will drop out. Now that you've got both isolators out of the way, this is a real good time to run a thread-chaser tap down the holes in the swingarm pivot. Remember that these pieces are assembled with heavy-duty red Loctite at the factory, so there's going to be some residue in there that could make it hard to get the bolts started when you re-assemble this piece. So clean those threads up now!
Step 9. Slip the new left isolator into place. Make sure it's aligned properly (see your Buell service manual). Reinstall the special tool, and repeat step 5 until you've compressed the (new) left isolator enough to slip the new right isolator into place. Make sure the belt's in the right place before you install the new isolator; the last thing you want to do is button up the job and discover the belt's dropped out! (Matter of fact, given that you've got the isolators off, inspect the belt closely--if it's even remotely near needing replacement, slip in a new one now. You'll thank yourself later!)
Step 10. Repeat step 7 and remove the special tool. You'll probably find the threads on the threaded rod are a bit monged up by now, so you may need an extra wrench to keep the rod from turning in strange ways.
Step 11. CAREFULLY start the allen bolts through the isolators and into the swingarm pivot. This can be tricky. You may have to fiddle with the jack a bit to align things properly. Be patient; you don't want to mess up the threads. The last time I did this, I found that the passage of time (and previous removal/replacement of the bolts when I did a belt replacement two years ago) had messed the threads up slightly. A quick cleanup with a 1/2" SAE fine tap solved the problem, and everything went together nicely. Don't forget the Loctite! Once both bolts are started, and you've again checked that the isolators are in the correct alignment, tighten the piss out of the bolts, to whatever monstrous amount of torque the manual specifies (about four grunts, if I recall correctly).
Step 12. Re-install the turnbuckle to the swingarm carrier. You may need to give the swingarm a little shove one way or the other to get things lined up. Re-install the ground strap (remember it bolts to the right side of the boss). Re-install belt guards, hugger, and back wheel. Lower the bike, give everything one last check, and you're ready to go."
- Daniel C. Starr

